Alpaca through the Chooser |
Alpaca devices are network connected, communicate through ASCOM's HTTP/REST Alpaca protocol and can be built in any technology that provides an HTTP based interface. They are quite different to the previous generation of devices that could only be connected directly to a Windows PC and that communicated with clients through Microsoft's Component Object Model (COM) technology.
ASCOM Remote Clients have been used since May 2018 to enable clients to communicate with Alpaca Devices . However, the Remote Clients are no longer needed because new Alpaca Dynamic Clients are built right into the Platform and can be created on demand through the Chooser. These dynamically created clients:
- Will be configured automatically using information from Alpaca devices that identify themselves over the network using the Alpaca discovery protocol.
- Will attempt to "self heal" by rediscovering an Alpaca device if its IP address changes.
- Will discover and communicate with Alpaca devices using IPv4 and IPv6
The remainder of this section shows how to create and use Alpaca Dynamic Clients to communicate with networked Alpaca devices.
In its default state Chooser works as it always has.

- Enable - turn on Alpaca device discovery
- Manage - Remove dynamic drivers that are no longer required
- Create - Make an Alpaca driver that you can configure manually
- Configure - Change the behaviour of the Chooser and Alpaca discovery

Click the Enable Discovery item to make Chooser search for Alpaca devices and a discovery status LED will appear and flash amber while the discovery is undertaken. If devices are discovered, the LED will become green and the discovered devices will appear in the Chooser list

Discovery must be enabled separately for each device type. This is so that you don't have to wait for discovery to complete when you don't have any Alpaca devices of that particular type. |
If no devices respond in time the LED will become red.

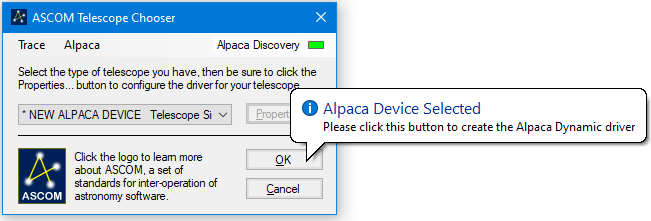
To create a dynamic driver for the newly discovered Alpaca device, select it from the drop-down list as usual and press the OK button. Visual confirmation to press the OK button is provided by a balloon message that appears for a few seconds when the device is selected. Please note that the Properties button will be greyed out because the driver hasn't yet been created.

After pressing the OK button the dialogue below will appear advising that Administrator level approval is required. Click the dialogue's "Do not show this message again" check box if you no longer wish to see this dialogue or the earlier balloon message. This setting can be reset through the Chooser Configuration menu if required.

After clicking OK the normal Administrator security dialogue will appear and, if approved, the driver will be created and you will be returned to the Chooser with the new dynamic driver selected.

There is no need to change the driver’s Properties because these will already have been set using information from the discovered device, but they can be inspected and changed if you wish.
Now press the Chooser OK button to select the newly created dynamic driver as normal.
The created driver will be available to all ASCOM clients on this PC - there is no need to rediscover the device on every client, you just need to select the device’s dynamic COM driver from the list as shown below. |


TThe Configure Chooser and Discovery dialogue enables you to set:
- Discovery IP port number - This only needs to be changed if your network already uses port 32227 for some other function. All devices and clients must be configured to use the same address in order for discovery to work.
- Number of Discovery Broadcasts - One broadcast should be sufficient but, if you have an extremely unreliable network this can be increased as required.
- Discovery Duration - The length of time that the discovery agent will wait for devices to respond before returning a response to the client. This wait time can be tuned up or down to match the responsiveness of your Alpaca devices and of the network between the client and the device.
- Additional Chooser Width - Increases the Chooser dialogue width to improve legibility if required
- Attempt DNS name resolution - Will try to resolve the IP address to a host name using Microsoft’s DNS resolver component. Please note that this can sometimes produce unexpected results because it can return NETBIOS names if there is no response from a real DNS server.
- List all discovered devices - Includes Chooser entries for Alpaca devices that already have COM drivers in the Chooser list. This can be useful for confirming that an Alpaca device is visible on the network
- Show device details - Includes ProgIDs and Alpaca Unique IDs in the Chooser display to aid debugging
- Show "Create new Alpaca driver" instructions - The dialogue that is displayed before a new dynamic driver is created explaining what is about to happen has a “do not show this message again” check box. This enables it to be reset if required.
- Supported IP Versions - Select whether Alpaca devices will be discovered through IPv4 or IPv6 networking protocols. For most installations, the default "IPv4 Only" setting is recommended.
Example of the Chooser dialogue with width set to 400

Example of the Chooser dialogue with “List known devices” on

Example of the “manage devices dialogue
